Charles Marden Fitch
Originally published in the December 1980 American Orchid Society BULLETIN. The nomenclature has been changed to reflect modern registration - 2/2010.

Charles Marden Fitch
Originally published in the December 1980 American Orchid Society BULLETIN. The nomenclature has been changed to reflect modern registration - 2/2010.
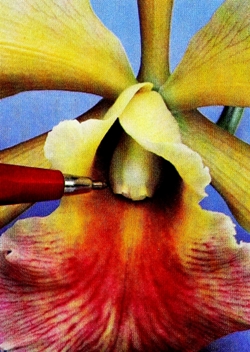
A close-up of a flower of Rlc. Spring and Summer. The pen tip points out the column.
Planned pollination of Cattleya species and their hybrids requires an understanding of column anatomy. Much simpler flowers such as amaryllis reveal reproductive parts at a glance, but cattleyas have evolved to the point where male and female parts are fused together into a ridged column.
The photographs accompanying this article show basic parts of the Cattleya column as they relate to pollination. A full explanation of how natural pollinators approach cattleyas in their tropical habitats can be found in Orchid Flowers, Their Pollination and Evolution by L. van der Fiji and Calaway H. Dodson. In captivity orchid flowers need us to do the job of bees.
To avoid accidental pollination, perhaps helped by wandering insects in the greenhouse, the female or pod-bearing flower is usually emasculated. The pollinia, or masses of pollen grains, will come off the column when the anther cap is pushed up and away from the lip. If one wishes to save the pollen, it is wise to hold a tissue below the flower as pollinia are removed to avoid their loss.
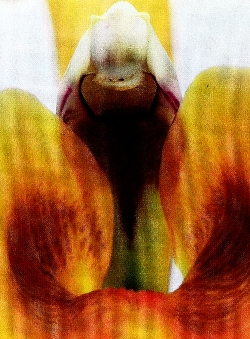
A bee's-eye view looking up from the lip into the underside of the column. Note the prominent anther cap containing the pollinia at the head of the column, the sticky depression which is the stigmatic surface below, and the ridge between the two called the rostellum.
Once the pollinia have been removed from the prospective pod flower, it is safe to proceed with pollination, using pollen of the desired male parent. Of course, the pollen can be used on the same flower from which it came, thus making a self-cross. The self-cross is actually self-pollination, not a combination of two different clones from the same cross (this is called a sibling cross). Even species will show some variation in seedlings from self-pollinated flowers. Naturally, complex hybrids produce a wide range of variations in seedlings produced by a self-pollination.

The anther cap and pollinia are easily re- moved when pushed up and away from the lip. This avoids any accidental self-pollination of the flower.
To proceed with pollination, put one or two pollinia on the stigma of the pod parent. I dip the tip of a pencil, small stick or tweezers in the stigma sap first, then use the tool to pick up the pollinia. In all cases, work with ripe flowers. Unripe or very old flowers have less chance of developing viable seed. A receptive stigma is covered with a sticky sap that grabs the pollinia and provides some simple nutrients in prompting the pollen grains to sprout.

Pollinia from another orchid species or hybrid can then be safely applied to the stigma, aff- ecting cross-pollination. Pollen grains are encouraged by the stigmatic fluid to germinate, producing pollen tubes which will travel down the column into the ovary.
If several flowers must be pollinated with scarce pollen, one can cut up individual pollinia, thus forming several small pieces which will serve to pollinate several flowers. Each pollinium has thousands of pollen grains, but one must look at them under a microscope to see them as individual parts. When adequate pollinia are available, some hybridizers put a pollinium on either side of the stigma as insurance that enough pollen will be present to fertilize the ovules. Each ovule must be fertilized by a pollen grain if a viable seed is to develop.
When the two prospective parents of a cross have very great differences in flower size, the smaller parent is often used to carry the pod since the larger flower is more likely to have pollen with long enough pollen tubes to reach the ovary. If pollen from a very small species is placed onto a large flower, there is always a chance that the pollen tubes will be too short to reach the ovules.

A vertical cross-section of the column and ovary illustrating the path which pollen tubes will follow until they reach the ovary containing the ovules and bring about fertilization.
The photographs of Rhyncholaeliocattleya (Brassolaeliocattleya) Spring and Summer (Cattleya [Lc. Cinnamon Stick X Rlc. [Blc. Xanthette) flowers show one flower partially dissected to better reveal the column. The photographs of Rlc. (Blc.) Virginia Cain [C. Claesiana X Rlc. [Blc.] Green-heart) present an entire sequence of the pollination process. One view shows a swelling of the ovary and dried flower parts 13 days after pollination. Cattleyas react to pollination by wilting. The column tip will also swell enclosing the pollinia. Other orchid flowers, such as the catasetums, will close in a day when just the pollen is removed.

The removal of pollinia from Rlc. Virginia Cain
Some breeders have the habit of cutting away as much of the flower as possible to avoid having decomposing tissues on the developing pod, but I find that the flower petals usually dry rather than mold. In very humid places, or with overhead watering, the petals might present a danger of rot. Actual fertilization of the ovules takes place only after the pollen grains have germinated in the stigma sap and grown a pollen tube down through the column into the ovary where they release the male cells to fertilize the ovules, thus producing viable seed.

Pollinia from the emasculated flower in the background
Putting pollen on a receptive stigma causes the ovary to swell and a pod to begin to develop. However, if fertilization is unsuccessful the pod will have only chaff (non-viable seed). If the male and female parents are not perfectly matched, as may be the case in complex hybrids involving different genera, only a small quantity of seed may develop directly after fertilization.

Pollination of another flower is done by applying the pollinia to the stigmatic surface.
Most Cattleya capsules will have some viable seed after 90 days. Actual fertilization occurs 60 to 90 days after pollination. The interval between pollination and fertilization for various orchids is clearly presented in TABLES 5-6 of The Orchids, A Scientific Survey, edited by Carl L. Withner.
The Jones and Scully, Inc. catalogs of the past few years offer a useful chart showing average times for harvesting orchid pods. The Jones and Scully recommendations for picking capsues to furnish seed for green-pod (unripe, non-split) sowing are 90 days for bifoliate cattleyas and 120-135 days for unifoliate cattleyas.
Seed begins to develop from the base of the capsule, then develops progressively toward the tip. If the parents are not compatible the slight quantity of viable seed may die if the capsule is left on the plant until full maturity, hence the popularity of green-pod culture. Picking a capsule before it is ripe also makes sterile sowing easier. The exterior of the immature capsule can be sterilized with a strong solution (i.e., 10 to 20 percent Clorox) before being cut open inside a clean-air box. This means that seed is obtained from a sealed, sterile capsule, so the seeds need not be washed in strong solutions which can harm embryos.

The location of the ovary in a recently-pollinated flower of Rlc. Virginia Cain
If you are new to the orchid pollination procedure, these photographs will help you to arrange a successful connection between your selected parent plants. For an in-depth reference showing the step-by-step process from pollination through seed-sowing, consult Rebecca T. Northen's excellent Home Orchid Growing. -'Talisman Cove', 1120 Cove Road, Mamaroneck, New York 10543.

A picture of the same flower 13 days after pollination showing the wilted sepals and petals and the swelling of the ovary in response

Get notified when orchid vendors have special promotions and exclusive savings.